 |
|
||||||||||
|
 |
|
||||||||||
|
Accent Lab, version 2.2
| Title: | Accent Lab, version 2.2 |
|---|---|
| URL: | www.accentlab.com |
| Contact: |
Accent Technologies 12240 Venice Boulevard Suite 22 Los Angeles, CA 90066 USA PHONE: +1 (310) 592-7040 Fax: +1 (310) 390-3584 Email: accent@accentlab.com |
| Type of product: | Pronunciation CD-ROM using American English |
| Minimum hardware requirements: | Windows: A 486DX or Pentium computer running Microsoft Windows 3.1, 95, 98, ME, NT 4, XP, 20 MB on hard disk C:, VGA graphics or better, sound card, microphone, speaker or headphones, mouse. The reviewer used this software on a computer running Windows 2000 and did not have a problem either installing or running it. Not available for Mac or Linux. |
| Price: | $39.95 + $5 shipping and handling (US funds). Shipping to Canada = $8 (US funds). Shipping to other countries = $25 (US funds). California orders must add 8.25% sales tax. VISA® and MasterCard® are accepted. |
Accent Lab is a program designed for non-native speakers of English to practice their pronunciation by following an audio prompt to elicit specific pronunciation features. The software not only records the user's voice, but it also employs a variety of visual feedback in order to aid in the analysis of specific language features. The three forms of visual feedback included in the program are pitch diagrams, spectrograms, and vowel charts. In terms of auditory feedback, there is also the ability to select which parts of the recordings you want to play back and at what speed you would like to listen to them. You can choose either a full playback or user specified partial-playback of the recordings, and listen to them at full speed or at a much slower speed. [-1-]
After the initial title screen, the user is greeted by a screen which provides two alternative ways of practicing (see Figure 1), Automatic Study Plans or Selecting a Lesson. The Automatic Study Plans are for users who want to practice all of the examples within a certain area. The Selecting a Lesson option is for users who prefer to choose which examples they would like to practice.
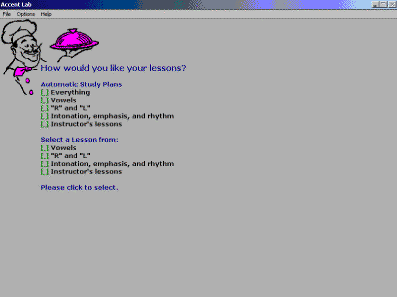
Accent Lab comes pre-loaded with three main areas of practice: "Vowels," "R and L," and "Intonation, emphasis, and rhythm." The "Vowels" section contains twenty example sentences utilizing minimal pairs to help practice the different vowel sounds. "R and L" has fourteen sentences using minimal or near minimal pairs of words for practice; and the "Intonation, emphasis, and rhythm" section has twenty-seven sentences with which to practice. As can be seen in Figure 1, there is also section called "Instructor's Lessons." This section allows a teacher to create up to twenty groups of lessons for students to work on.[-2-]
Once you have chosen which method, automatic or single lessons, and which language focus area to work on, the next step is to listen to a recording of the example sentence and then record yourself mimicking the same sentence as closely as possible (see Figure 2).
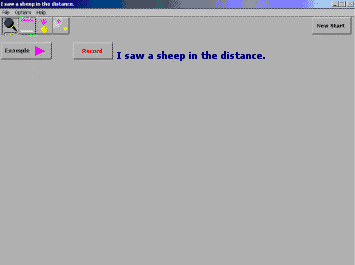
After a preset number of seconds elapses for the recording, Accent Lab moves to the next screen, Step 2, giving a visual representation of your pitch versus the pre-recorded pitch (see Figure 3).
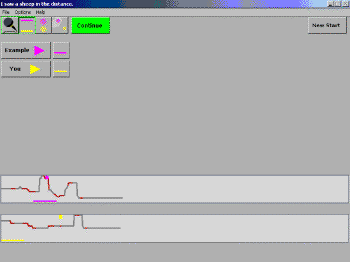
As can be seen at the bottom of Figure 3, the top pitch diagram with the purple line represents the pre-recorded voice and the lower one with the yellow line represents your recording. The grey and red variations in the pitch represent the speech intensity and rhythm. Red equals a stronger intensity of sound than grey.[-3-]
Another feature of the pitch diagrams is the ability to click on and move the long pink or yellow bars to isolate parts of speech you are interested in hearing more closely. When you click on either bar, the corresponding piece of that recording will play. Also, there is a small yellow square at the top of the lower pitch diagram that can be moved to match the vowel placement of the pink example diagram, which is important for the analysis part of the next two steps.
After comparing your recording to the pre-recorded one, you can either go back and re-record yourself again to try to get a more exact match or move on to the next screen, Step 3, which is marking formants on a spectrogram of your recording (see Figure 4).
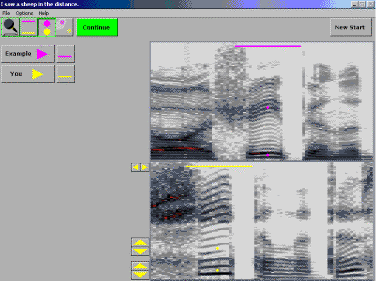
In this step, you have control over the two (or three in the case of "R and L" exercises) yellow dots in the bottom spectrogram. The goal here is to make sure that the dots are located in the speech area that you are comparing to the pre-recorded voice. For example, if you are comparing your /i:/ to the pre-recorded one, you can click near the yellow dots to hear if they are placed correctly. On the previous pitch diagram screen, if you moved the small yellow box over to match the vowel placement of the pre-recorded voice, the dots on the spectrogram screen should be pretty close to the correct place. You can make any needed adjustments with the pair of left and right arrows to the upper-left of the lower spectrogram. [-4-]
Next, you have to adjust each dot up or down until it is at the center of a formant bar. According to the Help Menu, formant bars are "concentrations of sound strength that form heavy bars" on the spectrogram. Use the two sets of up and down arrows to the left of the lower spectrogram to move each dot up or down until it reaches a formant bar. When you think you have them positioned correctly, press the bright green "Continue" button to move to the final screen, Step 4 (see Figure 5).
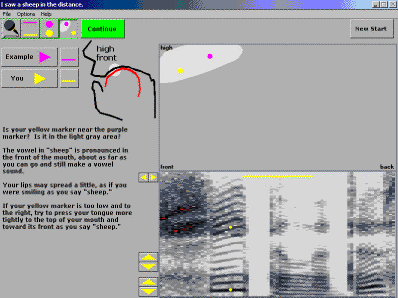
This final step is looking at a vowel chart and how your vowel placement matches up with the pre-recorded voice's vowel. In Figure 5, you can see that the pink dot at the top represents the placement of the pre-recorded voice's vowel /i:/ and the yellow represents your vowel placement. The lighter grey color indicates an acceptable range for the vowel to appear; whereas if your yellow dot appears in the darker grey area the indication is that you may not be articulating that sound in the proper place in your mouth. On the left-hand side of the screen, Accent Lab provides a cut-away diagram of the mouth area and briefly explains the point of articulation for that sound. It also includes some written pronunciation hints for how to change your manner or place of articulation, if needed.
At any point during this four step process, Accent Lab allows you to stop, go back and re-record yourself, or reposition the yellow square on the pitch diagram or dots on the spectrogram as desired and then resume the process.
After spending a few hours familiarizing myself with the program and figuring out how to get it to work with my microphone (unless you already use a microphone with your computer regularly, you will probably have to follow a chain of Windows clicks from Start: Settings: Control Panel: Sounds: Audio: Sound Recording Volume as I did in order to turn up the microphone volume to a level that the computer can record), I was lucky enough to have 5 adult volunteer testers from my Teaching Assistant Preparation in English: Pronunciation class each devote an hour or more to using and practicing with Accent Lab.
After briefing the students on how the software functioned, I allowed two of the students to work independently with it. I was always in the room when they were practicing, but unless they asked me for specific help, I did not make any comments on their speech or the use of the software. For the three other students, I sat side-by-side with them and worked with them in locating their weak areas, noting differences in pronunciation or rhythm, intonation, etc. as they worked on the examples. I also helped them interpret the pitch diagrams, place the dots on the spectrograph and talked about articulation differences when they were not close to the target sounds.[-5-]
What I found was that the two students who had minimal supervision spent less time on each activity and were generally less satisfied with their progress at the end of their software testing period. Although their written feedback indicated that they liked the program, neither of them has asked to use it again. On the other hand, the three who interacted with me more closely spent more time on each example, recorded and re-recorded several more times than the students in the other group and they have all expressed interest in working with Accent Lab again.
Based on written feedback I collected from them, my students said they liked the program because it offered them a visual representation of their problem areas as well as an aural one. Also, the software allowed them to repeat difficult sections right away rather than having to first go through all four steps for a more complete analysis. If they did not like their pitch diagram on the first try, they could immediately go back and record themselves again.
As a whole, all five preferred the "Intonation, emphasis, and rhythm" exercises. Although they all tried the "Vowels" and "R and L" sections, the majority of them felt they could get the most benefit out of the intonation section because it combined intonation, emphasis, rhythm and vowel work together in one exercise. This preference may also have been influenced by the focus of my class, in that we have been spending more time on supra-segmentals, like rhythm, emphasis, and intonation, than on segmentals, like vowels and /r/ and /l/; so, at the time they worked with this software they had a heightened awareness of their weaknesses in the supra-segmental areas.
Despite their generally favorable reviews, the students did dislike a few things about Accent Lab. For example, they had some trouble with the microphone not recording everything they said. Although the volume for the microphone was set at the highest level in my control panel, most of the students repeatedly received flat bars in their pitch diagrams, which according to the customer service representative at Accent Technologies, indicated that they were not speaking loud enough for the program to record everything they said. The students were using a large, fairly expensive, hand-held microphone designed for use in computer language lab situations, but two or three times out of ten they would see a high, flat line on their pitch diagram. I worked with them on making sure the microphone was directly in front of their mouth and that they spoke in a loud voice, but there were still the occasional flat lines they had to deal with. Even after changing microphones, there continued to be similar problems.
A second area of discontent for the students was with the spectrogram. Many students had trouble locating the formants on the spectrogram and thus, in Step 4, they were not able to get a good reading of where their vowel or /r/ or /l/ placement was in relationship to the pre-recorded voice. They often got readings that showed their place of articulation to be wildly different from the native speaker's sample, when in reality, they were pronouncing the segmental just fine. After several attempts at placing the dots on the formants and getting false or quite disparate readings, many students started to skip these steps, unless I helped them.
Another dislike of some of the students was the male voice which was used for all of the examples in the program. Some students felt that he spoke unnaturally slow in many of the sentences and that he over-articulated some words. Some students also noticed that he did not always rise and fall on content words, as they had been taught in their textbook that native speakers of American English usually do. Sometimes he would have falling intonation on content words and rising on function words. This frustrated them somewhat. [-6-]
Other students wished that there had been more of a variety of voices used for the examples, or at least a choice between hearing a female or male voice for each example.
Some final thoughts that my students had about the program was that they wished it contained more examples in each section and some of them wanted longer sentences or even paragraphs in the intonation section. Also, three students said they would have liked the ability to save their own voice recordings so that they could go back and see if they had improved over successive recordings.
Based on my students' comments and my own use of the Accent Lab, the strengths of this program lie in its visual pitch diagrams and the ability for students to compare their diagrams to those of a native speaker of American English; the ease of going back over earlier steps to correct mistakes or redo items; and the information about points of articulation in the mouth for specific sounds. Also, the ability for teachers to author as many example sentences as they would like is also wonderful.
On the other hand, as an instructor who might consider using this program with students on a regular basis, the weaknesses I found with Accent Lab had to do with things such as the instruction manual, which consisted of only one page of "quick start" advice. This meant I had to spend quite a bit of time using the software's Help Menu to try to decipher the features of the program. The information in the Help Menu is fairly complete, but the menu interface is not completely intuitive. I often found myself on pages I had read before, just in order to get to a different page that was not linked in the "Contents" list of the main menu. The Help Menu does allow you to print out a page of the information you are currently viewing, however. This was helpful.
Second, along with my students, I also had some trouble using the spectrogram to accurately place the segmental dots so it would give a true reading of a student's point of articulation. The software's Help Menu description of how to distinguish and mark for formants was quite basic and did not include a visual aid, which would have helped tremendously. At times, I could definitely understand my students' frustration with this step. I was also slightly concerned that had I not been there to train them and give them feedback the students may have thought they were terribly mispronouncing sounds based on the Step 4 visual when they really were just having trouble getting the correct spectrogram placement in Step 3.
That being said, however, the benefits of Accent Lab outweigh the weaknesses, in my opinion. I would, however, highly recommend that any teacher planning on using this software monitor students closely while they practice to alleviate the problems mentioned above. [-7-]
If you are a student who is interested in buying this program, I would suggest that you work with a native speaker of American English who is trained in teaching pronunciation and who can spend some time working to understand this program's features before using it with you. If that is not possible, you should try to be diligent in working through the exercises slowly and surely with the goal of improving your own listening skills so that with the visual help you can begin to recognize differences in your own intonation, rhythm, emphasis or segmental sounds compared to the native speaker of American English that is on the recordings. Also, do not be frustrated if you have trouble getting your individual sounds, like vowels and /r/ and /l/, to match up with the native speaker's pink dot in Step 4. It may be that you are just having trouble marking the formants in Step 3, not that your pronunciation is so different.
Sue Almén-Whittaker
University of Iowa--Iowa City, USA
<almen-whittaker@uiowa.edu>
|
© Copyright rests with authors. Please cite TESL-EJ appropriately. Editor's Note: Dashed numbers in square brackets indicate the end of each page for purposes of citation.. |
|
||||||||||