March 2010 – Volume 13, Number 4
Windows Movie Maker ver. 6.0
| Title | Windows Movie Maker ver. 6.0 (http://windows.microsoft.com/en-US/windows/downloads?os=other) |
| Publisher | Microsoft Corporation, 2007 |
| Type of product | Digital video creation software |
| Platform | PC |
| Minimum hardware/software requirements |
PC with Windows XP or Vista, 7.04 MB free memory |
| Price | Available as a free download; included with most versions of Windows XP and Windows Vista |
| Description | Allows users to combine video, pictures, audio, and text to create videos. User friendly and available in many languages. |
Introduction
All levels of education are feeling the push to integrate technology into teaching. However, technology continues to evolve rapidly (Bitner & Bitner, 2002; Wang & Reeves, 2003), making it difficult to find lasting, meaningful, and effective ways to use technology to help students achieve their learning goals. Nonetheless, one technique that seems to have passed these tests and become quite popular is that of digital storytelling, a type of project in which students must put together pictures, text, video footage, and their own recorded voices to form coherent video narratives (Adams, 2009; Hull & Katz, 2006; Ianotti, 2005; Ohler, 2006; Robin, 2008).
Movie Maker 6.0, which is standard on all Windows Vista systems, is a program designed to allow people with relatively little technical knowledge to be able to do exactly this. It allows users to combine pictures and video footage together with text, music, and narration into a digital video file, thus lending itself particularly well to digital storytelling projects (Czarnecki, 2009; EDUCAUSE Learning Initiative, 2007). In this article, I will explain each step in creating a digital film using Movie Maker. After this explanation, I will describe how a Movie Maker project can be used in an EFL/ESL classroom.
Movie Maker: The basics
Figure 1 shows the four important sections of the screen which appear when Movie Maker is opened: the storyboard/timeline, the imported media folder, the preview screen, and the tasks bar.
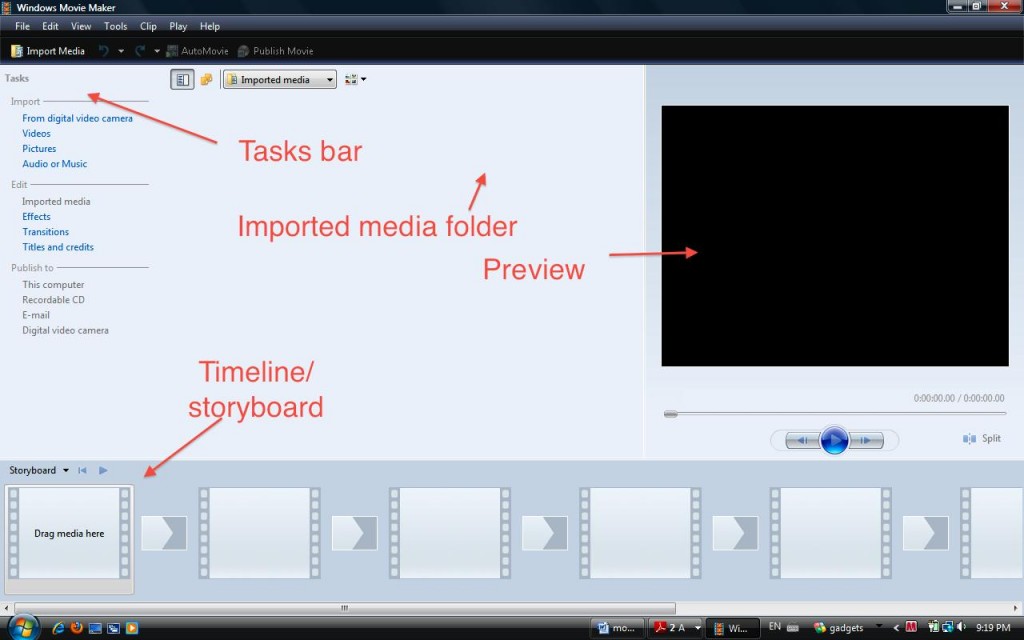
Figure 1. Movie Maker Opening Screen
The Tasks bar shows all of the options for importing files, editing files, adding text to pictures and video, creating transitions between pictures, and finalizing and exporting the completed video.
The Imported Media folder shows all of the files which can be dragged and dropped into the timeline/storyboard to create a video. It is important to note that files must be imported into this folder before they can be used in any video project.
The Timeline/Storyboard is the area where pictures, video footage, and audio can be sequenced. It is also the area where narration can be added once all the elements have been assembled.
The Preview panel shows what the completed video will look like in real time. It also provides previews of what different effects and transitions will look like before actually adding them to the project.
Creating a movie
Though there are several different ways to create a movie using Movie Maker, it is usually best to do certain things before others. I have separated these things into four steps as follows.
Step one: Importing and placing pictures, audio and/or video footage
It is possible to use only pictures, use only video footage, or use a combination of the both. Along the left side of the screen, there are several options. To begin, it is necessary to import files into the project. This is done by clicking on one of the Import options. For example, when importing pictures, just click on the “Pictures” link under Import, as shown in Figure 2. By highlighting several picture files and clicking Import, the Imported Files folder fills up with files that can be placed in the Storyboard/Timeline.
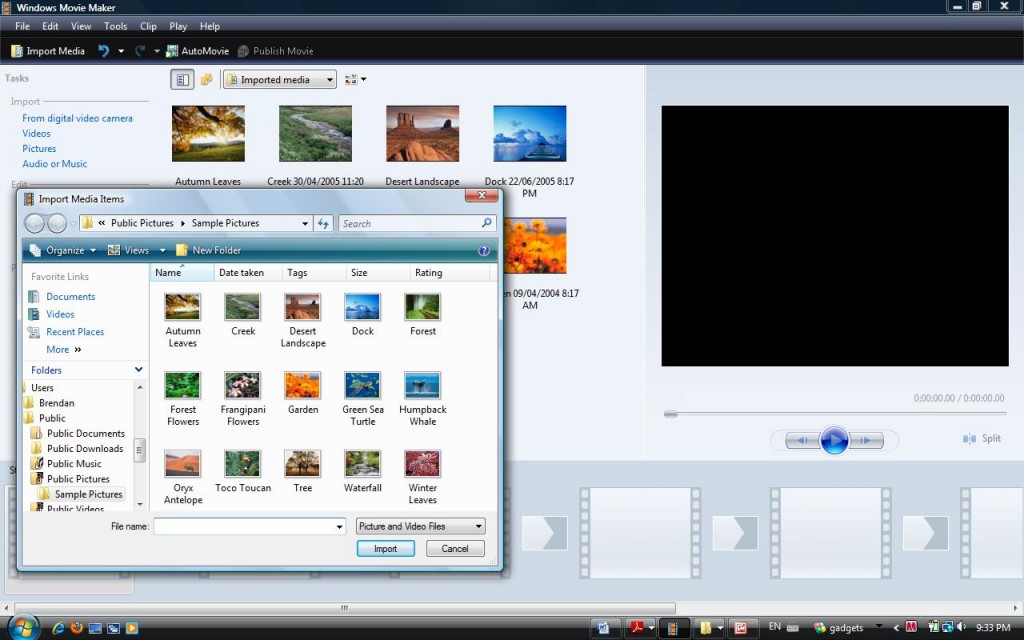
Figure 2. Importing Pictures
Figure 3 shows the Storyboard, which is the area that is used for dragging and dropping pictures and video as well as adding transitions.
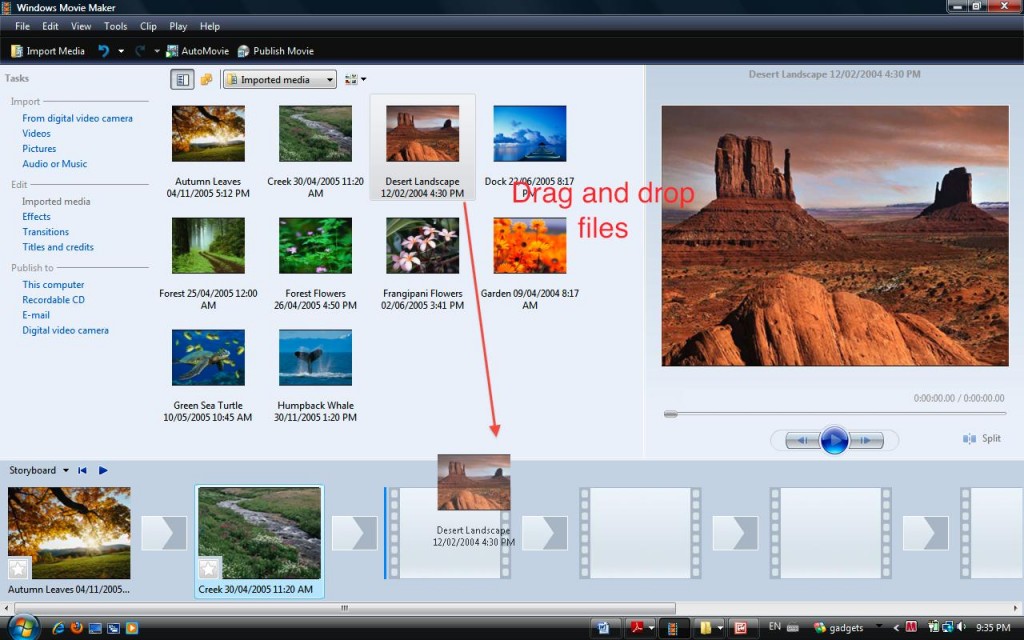
Figure 3. Dragging Pictures to the Storyboard
Pictures and pieces of video footage are dragged and dropped directly from the Imported Media folder. Each picture or piece of video footage is placed onto an individual slot on the timeline. These pictures can also be rearranged by simply dragging and dropping them into other places.
After adding as many pictures and/or pieces of video footage as desired, the audio track can be inserted. To do this, it is necessary to switch from the Storyboard view to the Timeline view. To do this, it is necessary to click on the tab on the left top side of the timeline, as shown in Figure 4.
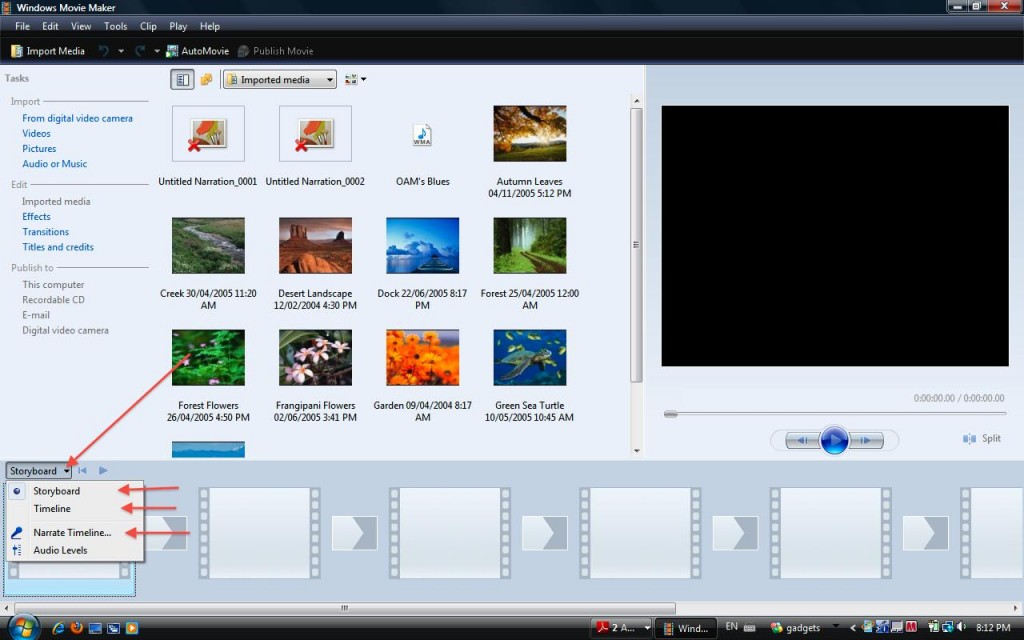
Figure 4. Switching to Timeline View
After clicking on this tab, select the Timeline view, and the display will change to the following:
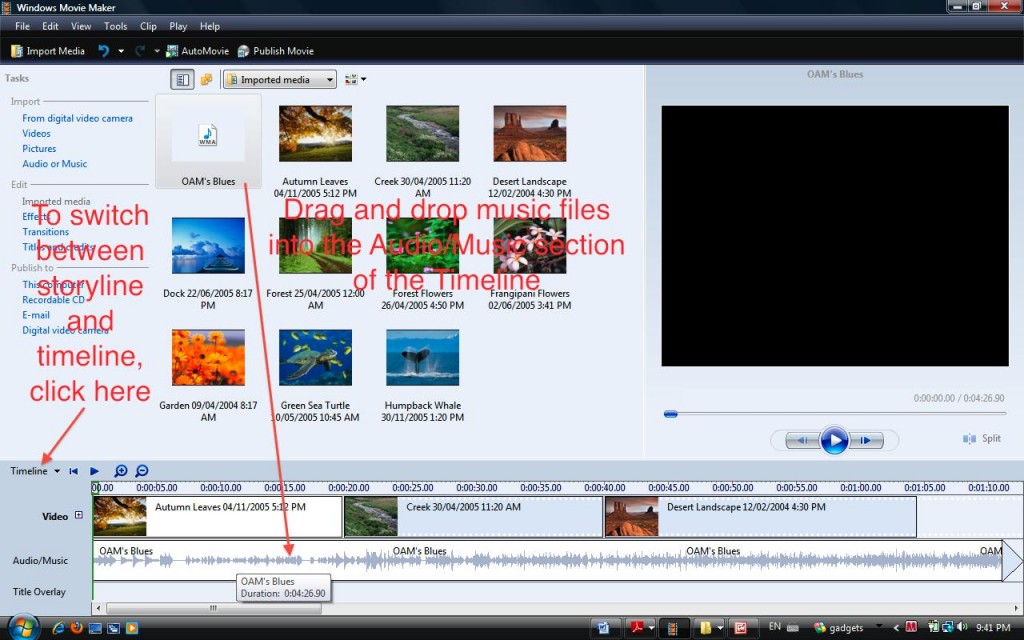
Figure 5. Timeline View
Audio files are dragged and dropped into place the same way that picture files are. Though many types of audio files will work, the easiest and most common ones to use are .wav and .mp3. For the sake of memory, .mp3 files are much easier to use, since they are much smaller than .wav files.
In the Timeline view, it is also possible to change the length of time that a picture will appear in the video. By clicking on the far right side of the picture file (seen in the Video part of the Timeline shown in Figure 5) and dragging it to the right, the length of time that the picture is on the screen increases. Likewise, clicking and dragging to the left decreases the length of time that the image is visible. Audio files work the same way.
Step Two: Adding transitions, effects, and titles/text
Once all pictures, videos, and audio have been found, imported, and arranged on the Storyboard/Timeline, transition effects can be added between pictures and other effects can be added to individual pictures. This is done by clicking on the Transitions button and Effects button inside of the Tasks bar, as shown in Figure 6.
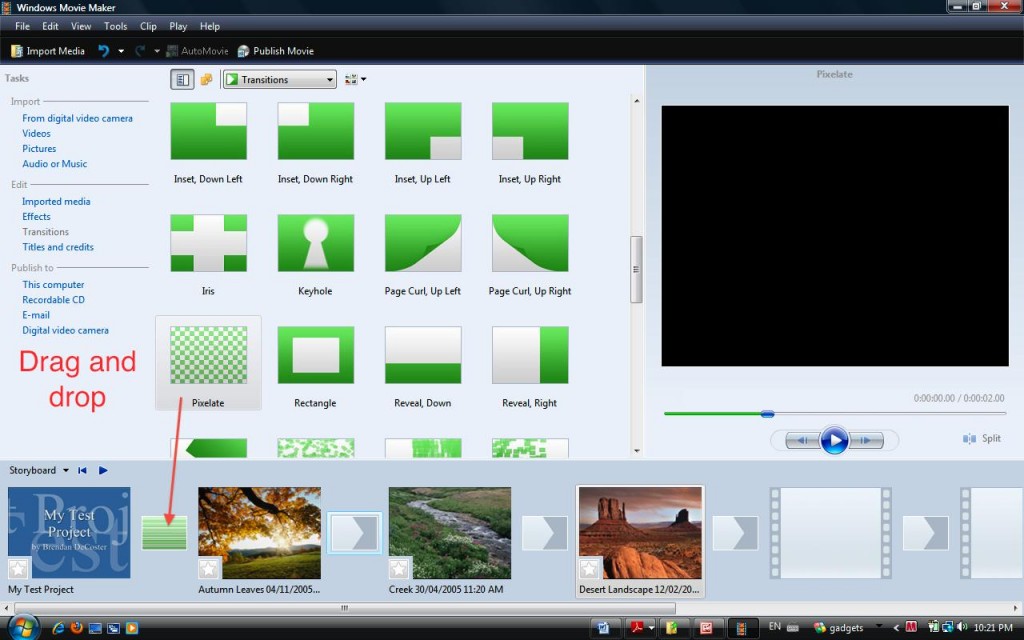
Figure 6. Adding Transition Effects
Transitions are dragged and dropped the same way that audio files, pictures, and video footage can be dragged and dropped. They are added in the small boxes between each picture in the Storyboard view. Transitions work the same way that Transitions work in Power Point: They are short animations that help to link one picture to the next one. Effects are done in the same way, but they are added to the picture itself. Effects provide motion and change in a selected picture, which can be very useful if the picture is being shown for a long time. Effects and transitions can be added and removed without causing any irreparable changes to the project.
After choosing transitions and effects, title and credits sections are added by clicking on the Titles and Credits link in the Tasks bar (see Figure 7). After clicking on this link, the screen appears as shown:
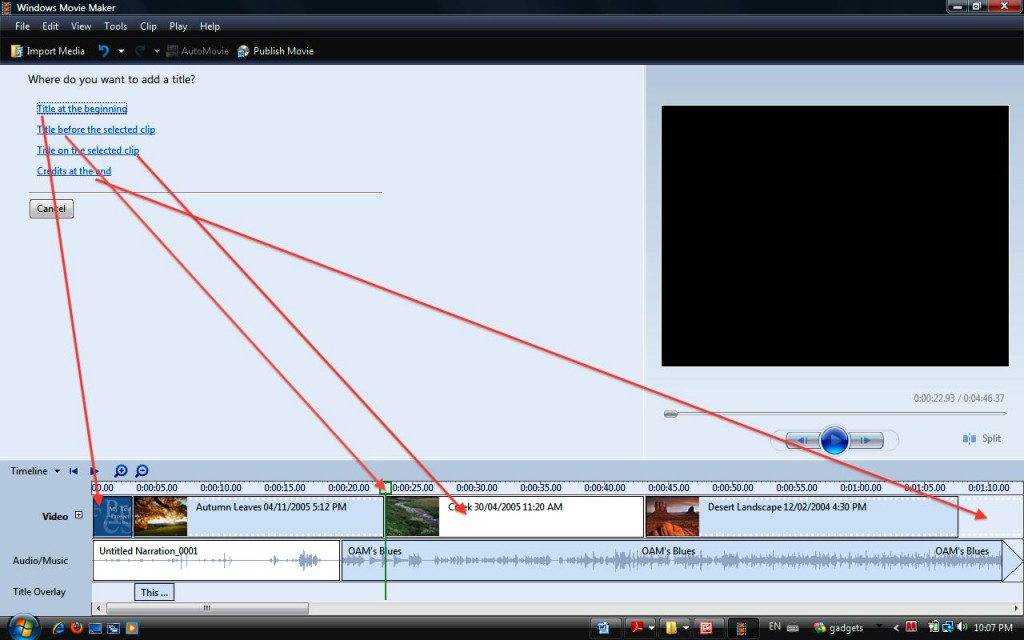
Figure 7. Adding Titles and Credits
It is possible to add a title section before the pictures, a credits section at the end of the pictures, a screen with only text between pictures, or text directly onto one of the pictures. By clicking on a picture and then clicking on “Title on the selected clip,” text appears directly on only one picture. By clicking on a picture and then clicking on “Title before the selected clip,” a new space appears which will show only text as a transition before the selected picture.
Step Three: Adding narration
Once everything else has been taken care of, it is time to record the narration. This requires a computer with a microphone. If the computers which students are using do not have built-in microphones, it will be necessary to find computer microphones. These are generally fairly cheap (a quick Google search shows several for less than $10 US), and most students will already have one available to them (Czarnecki, 2009; EDUCAUSE Learning Initiative, 2007; Ianotti, 2005).
Clicking on the Timeline/Storyline tab yields the “Narrate Timeline” option, as shown in Figure 8:

Figure 8. Choosing the “Narrate Timeline” Option
After clicking on the Narrate Timeline option, the following screen comes up:
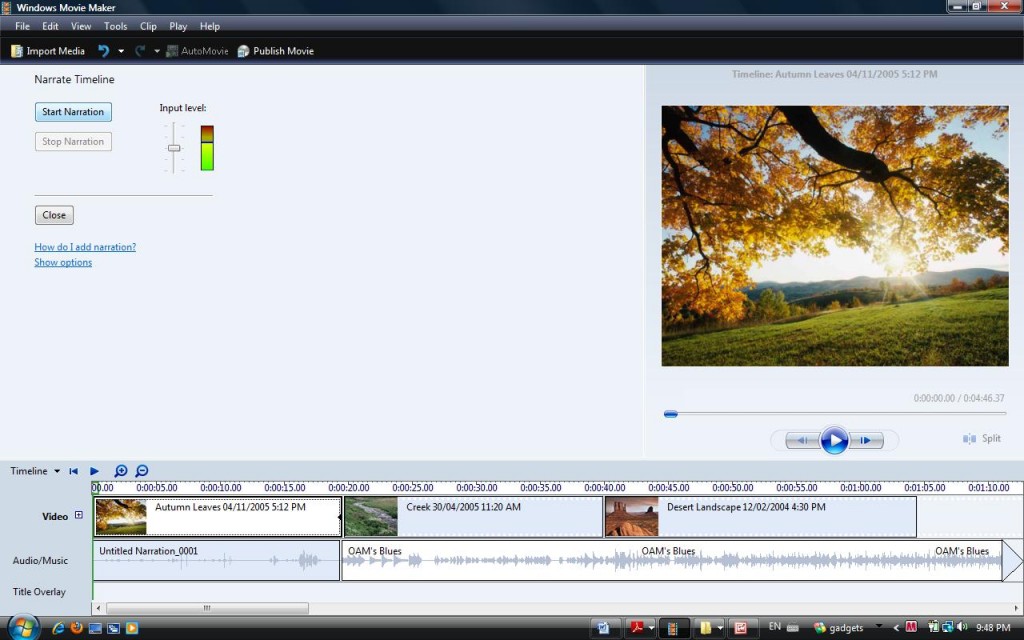
Figure 9. Adding Narration
By clicking on the button marked “Start Narration,” the computer will start recording straight from the microphone. The “Input Level” marker next to the Start Narration button shows how loud the sound coming into the microphone is. If the Input Level marker stays in the green, the sound should be fairly good.
It is usually best to practice doing a narration several times before actually recording it, but it is possible to record several narrations. The finished narration file will appear on the Timeline on the same line as any other Audio files.
Step Four: Publishing the project
When everything has been added and the project is done, the final step is for the project to be published. Up until this point, all the work that has been done has been part of a project file, not a completed video. The last step of the creation process combines all of the pictures, transitions, effects, and audio into one video file. This is done by clicking on one of the Publish To links in the Tasks bar. For general purposes, the best one to click on is Publish to This computer, which will result in the screen shown in Figure 10.
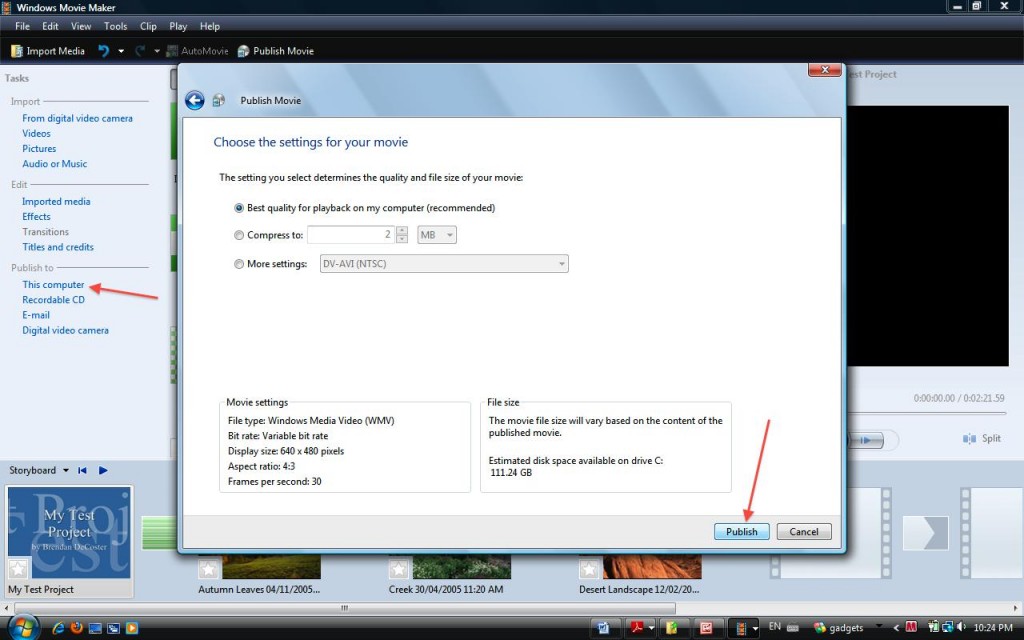
Figure 10. Publishing a Project
By clicking Publish in the box that appears, the file will be compressed and saved as a .wmv file, which is easily playable in Windows Media Player. It is possible to save it as another file type as well by selecting More Settings.
Once this is all done, the finished product can be viewed on both Macintosh and PC systems. The final file will likely be very large, so it is important to use a computer with a large hard drive.
Evaluation and applications in the EFL/ESL classroom
Overall, this is a wonderful program, as it is very user friendly and it engages both instructors and students in meaningful interactions in a task-based format (Brown, 1994; Ohler, 2006; Willis & Willis, 2001). Instructors can use this program quite easily to put together instructional videos. As a corollary to teaching a particular expression or grammar point, a video can be placed online for students to view at their leisure for additional practice. Since it is possible to put together a video which uses only audio and the text slides described above, it is very easy to focus solely on key words and grammatical forms in a video. However, it is in the potential for students to interact and create their own projects that this program has its greatest strength.
Using Movie Maker to create digital storytelling projects provides multiple opportunities to recycle vocabulary, grammatical structures, compositional and narrative skills, and real-world academic skills. Making a movie is a great learning opportunity for all levels of students. Selecting pictures and audio can be done either through using students’ personal files, files provided by the teacher, or through the internet by using “copyleft” photo and audio sources such as yotophoto.com (Ohler, 2006; Robin, 2008). The opportunities for teaching valuable language skills, cultural skills, and academic skills are multiple here. Since students can take their own pictures and transfer them into a computer, it is possible to create very individualized projects, something which can be very rewarding for advanced-level students (Ianotti, 2005). On the other hand, if the teacher chooses to assign pictures, it is very easy for students to work in groups to decide on their proper arrangement, timing, etc., representing a communicative activity which can be paired with a lesson on turn-taking and negotiating, activities which are well-suited to intermediate and advanced students (Brown, 1994; Willis & Willis, 2001). If the teacher asks students to find non-copyrighted or free-use photos and/or audio from the internet, this presents the class with a chance to talk about the notions of intellectual property and plagiarism, which are key academic concepts needed in universities (Adams, 2009; Ohler, 2006).
Since time is always an issue in EFL/ESL teaching (Brown, 1994; Ianotti, 2005), it is perhaps best to use pictures instead of video files when using Movie Maker. Transporting video files requires flash drives with a lot of memory, and data transfer problems can occur quite easily when transferring files from one computer to another (e.g., the file type might be invalid on one system or the appropriate plug-in may be unavailable on another). Pictures files are also sometimes difficult to work with, but since most computers save such files as either .bmp or .jpeg, there are far fewer problems with pictures than with videos.
One very important thing to mention here is that students will need to save their projects and keep all of their pictures on the same flash drive. It is in fact much better to save the project on several different flash drives (especially when working in a group), since this lessens the chances of losing files or projects. This again is a good opportunity to prepare students for vital academic skills, since having a backup copy of files is an extremely important habit to develop in school life (Wang & Reeves, 2003).
A word of caution is necessary regarding transitions and effects, since these are very fun to play with. Students sometimes have a tendency to focus a lot of their time and energy on picking the right transitions and effects to the detriment of the language and content of their projects (Ianotti, 2005). Though transitions and effects can be very important to a story, they may prove to be distractions when working with tight deadlines. If there is little time to spend on the project, it is best to limit students to using, for example, only three types of transitions and/or effects.
Summary
Movie Maker 6.0 is a useful program for putting together digital movie projects. It is particularly well suited to creating digital storytelling projects, which are an increasingly popular project type in universities. By following a step-by-step process of finding pictures and music, importing them into the program, arranging and editing them, and finally adding a narration, instructors and students can put together meaningful projects which utilize all areas of language and cultural skills. Since time is always a constraint on projects, it is necessary to clearly delineate steps, tasks, and techniques when using Movie Maker. Overall, this program offers a wonderful array of possibilities to the ESL/EFL classroom.
References
Adams, C. (2009). Digital storytelling. Instructor, 119(3), 35-37. Retrieved from Professional Development Collection database.
Bitner, N. & Bitner, J. (2002). Integrating technology into the classroom: Eight keys to success. Journal of Technology and Teacher Education, 10(1), pp. 95-100.
Brown, H.D. (1994). Teaching by principles. Englewood Cliffs, NJ: Prentice Hall.
Czarnecki, K. (2009). Software for digital storytelling. Library Technology Reports 45(7), 31-36.
EDUCAUSE Learning Initiative (2007). 7 Things You Should Know About Digital Storytelling. Boulder, CO: EDUCAUSE. Retrieved on February 8, 2010 from www.educause.edu/ELI/7ThingsYouShouldKnowAboutDigit/156824.
Hull, G. & Katz, G. (2006). Crafting an agentive self: Case studies of digital storytelling. Research in the Teaching of English 41(1), 43-81.
Ianotti, E. (2005). How to make crab soup: Digital storytelling projects for ESL students. In Transit 1(1) 10-12.
Ohler, J. (2006). The world of digital storytelling. Educational Leadership 63(4), 44-47.
Robin, B. (2008). Digital storytelling: A powerful technology tool for the 21st-century classroom. Theory into Practice 47(3), 220-228.
Wang, F. & Reeves, T. (2003). Why do teachers need to use technology in their classrooms? Issues, problems, and solutions. Computers in the Schools, 20(4), 49-65.
Willis, D. & Willis, J. (2001). Task-based language learning. In R. Carter and D. Nunan (Eds.), The Cambridge guide to Teaching English to Speakers of Other Languages, pp. 173-179. Cambridge: Cambridge University Press.
About the Reviewer
Brendan DeCoster is an adjunct instructor of ESL at the American English Institute at the University of Oregon. He has worked extensively with digital storytelling projects as a teaching assistant in undergraduate and graduate level classes at the University of Alberta, Canada and has also taught ESOL courses at universities in both South Korea and the US.
<decoster uoregon.edu>
| © Copyright rests with authors. Please cite TESL-EJ appropriately. |

